
Installation
Prerequisites
Before you start with the installation, you should check if your computer meets the requirements. Currently available computers should have no problems at all. If you have an old computer running Windows XP you may have difficulties. The Host works on Windows XP and later and on Linux. If you have a Macintosh computer, check for the Repetier-Host Mac on this site. All you need is .NET framework 4.0 or a recent Mono installation, if you are running Linux. The only other requirement is a graphic card with OpenGL. For a good rendering performance OpenGL 1.5 or higher is needed. With lower versions you may have speed issues with live preview.
Getting the software
Go to the download page and fetch the latest version for your os.
Windows installation
The windows version comes with a installer. After downloading run the installer and you are done. The installer already contains Slic3r, Prusa-Slicer and CuraEngine.
Silent install
For a automated silent install you need to skip Repetier-Server installation and suppress message boxes. With the following command line you can run a typical silent install:
.\setupRepetierHost_2_3_1.exe /COMPONENTS="Components=app,slicer,slicer\curaengine,slicer\slic3r,slicer\slic3rpe,assoc,assoc\stl,assoc\ast,assoc\3mf,assoc\obj,assoc\amf,assoc\gcode,assoc\gco,assoc\g" /MERGETASKS="desktopicon" /VERYSILENT /SUPPRESSMSGBOXES /CLOSEAPPLICATIONS
Silent uninstall
For a silent uninstall call uninst000.exe with this parameter:
"C:\Program Files\Repetier-Host\unins000.exe" /VERYSILENT /delregistryYou can omit /relregistry if you want to keep the registry settings.
Linux installation
The linux version comes as gzipped tar file. Move it to where you want your files and unpack its contents and run the post installation script:
tar -xzf repetierHostLinux_1_03.tgz
cd RepetierHost
sh configureFirst.sh
After that you have a link in /usr/bin to the installation, so you can start it with repetierHost. Make sure you have all required Mono libraries installed. If you are in doubt, install Mono develop, which has all needed libraries as dependency.
One problem that most linux distributions have is, that the normal users are not allowed to connect to a serial console. You need to put your user into the right group. On Debian you can call:
usermod -a -G dialout yourUserName
to add your user to the group dialout.
Configuration
First start
After the first start a dialog may pop up asking you, where your work directory should be. The latest windows versions skip this step, because the installer already created a work directory for you. You can select any directory, where you have write privileges, but it is advised to use a separate directory for this purpose.
The work directory is, where the host will put temporary stl files, sliced results and if enabled the log file.
Configuring your printer
The next step should be, to configure your printer so you can connect your computer with the host. Make sure your printer is connected and enabled. Some printer need special driver to access the device, so make sure the drivers are also installed. If you have uploaded the firmware to your printer, the driver is already installed.
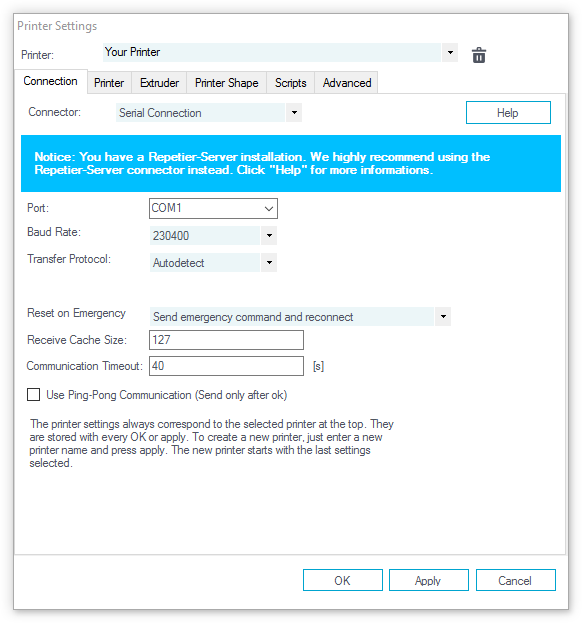
Go to the menu “Config”->”Printer Settings” or klick the button  . You will see a window like this:
At the top you see a drop down box, with the currently selected printer. At the start you have only the default printer. To create a new printer you only need to change the printer name and press “Apply”. The new printer will start with the same settings as the last selected printer.
Below the drop down box you see four tabs with most off the data stored with the printer configuration. In addition to this, for each configuration a start/end/pause/kill and five user defines scripts are stored with configuration. These can be changed in the g-code editor, which is described in a different chapter.
In this first tab, you set how to connect with your printer. In “Port” you select the port, where your printer is connected. At the opening of the window, all available ports were scanned and added to the list. If you connect your printer when this menue is already open, klick “Refresh Ports” to detect the new port. Select the right one. Then select the baud rate entered into the firmware. Stop bits and parity are correct for 99,9% of the printer, so leave them untouched.
The transfer protocol determines, how the host will communicate with the printer. All supported firmwares work in ASCII mode. The Repetier-Firmware also supports a binary format. The advantages of the binary format are:
- Reduced data size. Normal data is reduced to 50%.
- Better error correction.
- Less computation time needed for the firmware to parse the data.
You can leave this on “Auto detect”, which will automatically switch to binary format if Repetier-Firmware is detected. For all other firmwares, the ASCII communication is used.
The next decision is, how to send data to the firmware. The method that was planned with the first firmwares works like ping-pong. The host send a command and waits for the firmware to return an ok. This causes latencies, which can result in empty buffers if you have many small moves. To improve speed, you can allow the host to send more then one command at once. Your printer has a input buffer. As long as you are sending not more then the size of the buffer, you can send more then one command if they fit into the buffer. So if you disable the ping-pong mode, the host will send up to “Receive cache size” bytes, before it waits for the ok, telling him that the command is processed. If you are unsure on the printer buffer size select 63, which works on all printers. Firmware compiled with Arduino versions before 1.0 even allow 127 bytes.
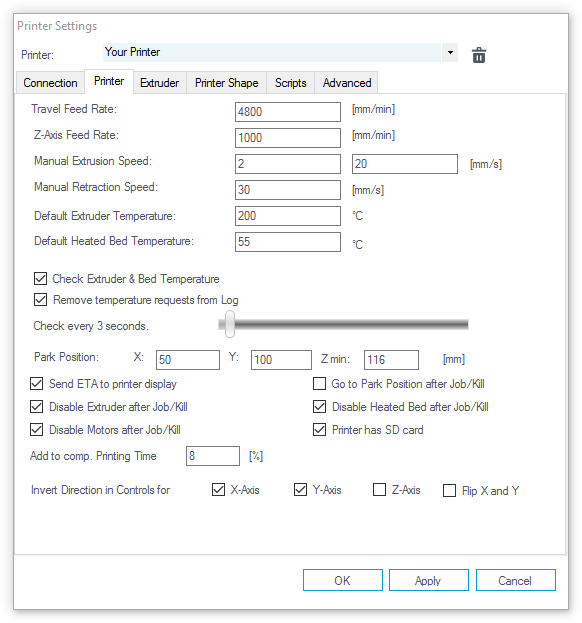
The second tab defines important behavior you want. The Travel feed rate and Z-axis feed rate are used, when you move the extruder with the manual controls. The temperatures are set in the manual controls as start values. You can change them there any time.
When you turn the extruder on, you surely want to know the temperature of it. This is done by sending the M105 command to the printer. If you don’t plan to do this yourself every x seconds leave the option checked. You can also select how often you want the host to check the temperature. The default 3 seconds are a good start. With every request you get 2 entries in your log. The host will show the read temperature at the bottom in the status bar, so removing these messages from the log makes it much more readable.
Park position is where you like your extruder head the most. In the manual control you have a button to move the head to the park position. You can also tell the host to go to this position, after a print is finished.
The next check boxes define, what the printer should do, when a print is finished and if a SD card is available. If no SD card is available, the corresponding tab will not be displayed.
With “Add to comp. printing time” you define, how the host should correct the computed printing time. When the host computes the time from g-code, it assumes all moves are executed at the feed rate requested. If you do a slow print, this will be quite correct, except that it doesn’t take the time to heat the extruder/bed into account. With fast prints, the firmware needs to accelerate/decelerate a log, which increases the print time. After some prints, where you compared the computed and real printing time, you should be able to figure out how much percent you need to add to the computed time. Don’t expect to match every print. Depending on the geometry, the time will still differ a bit.
At the end you can change the moving direction in manual control for each axis.
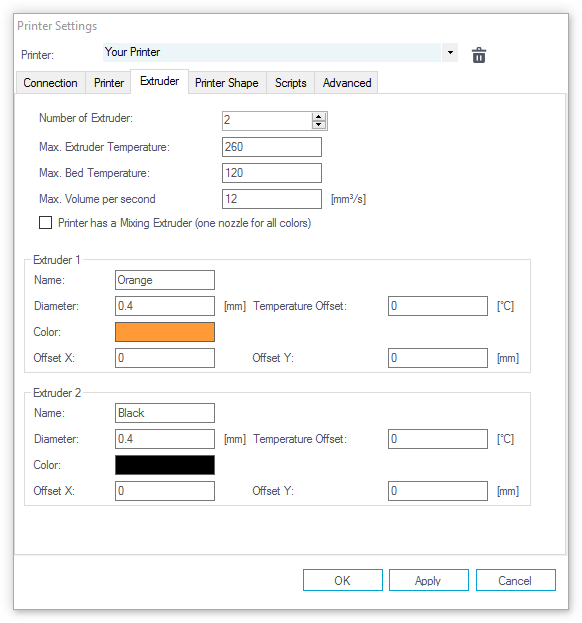
In the “Extruder” tab you can define the numbers of extruders, the max. temperatures, that are shown in the manual control. The max volume per second defines the maximum amount of filament in mm³, the extruder can melt per second.
For each extruder you can define a name, a nozzle diameter (the diameter is only used for CuraEngine), a temperature offset, which is added to the filament temperature, if this extruder is selected (this also works only with CuraEngine), a color, which is used for preview, and x and y offset, which adjusts the extruder position for multi extruder prints. Some firmwares like Repetier-Firmware correct the offset themself, so in this case offset should stay 0.
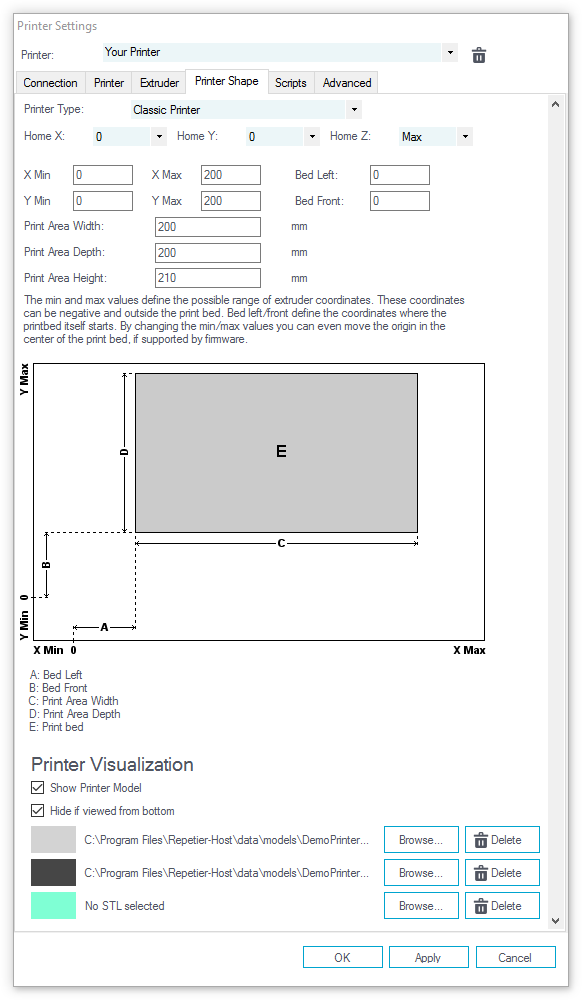
The “Printer Shape” tab defines your printer shape, or to be more exact the shape of your build area. The host will use this to limit your moves and to check, if your models fit onto the print bed. You can also define the position of the x and y end stop.
The dump area is a rectangular hole in your print bed, where you can drop filament. Mostly the original Mendel had this. If you don’t have a dump area, leave the option unchecked.
If you like to add a visualization of your printer, you can design it with a 3d editor. Important points:
- You can have up to 3 stl files and assign each a different color.
- You need to export it, so that it fits bed position. The imported files do not get translated after loading.
- Sometimes it is useful to view the model from below. You can either decide to hide the printer if viewed from bottom or design you printer that you can view the model from bottom.
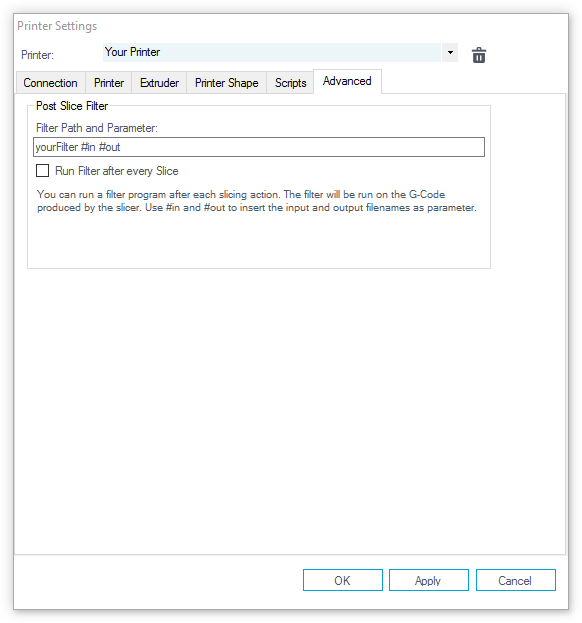
The last tab is for advanced configurations, you most probably will never need. Currently it only contains a post process filter. After the slicer is done with slicing, you can start an external program with the g-code. This program must save the resulting g-code in the file named by the #out parameter.
Units Settings
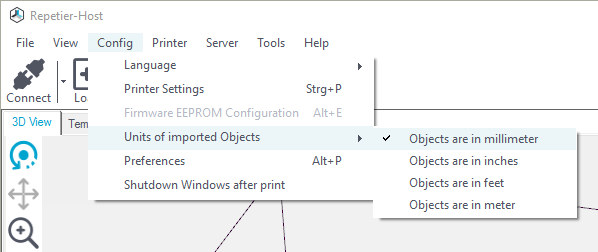
The host uses internally only millimeters. Unfortunately STL and OBJ format do not contain a scaling hint. Therefore you need to select the units used for the creation. That way the host will convert the units correctly into millimeters.