Installation
Prerequisites
You need a Macintosh computer with OS X 10.8 or higher running in 64 bit mode. Some printer boards need a driver, like the FTDI driver, for the serial connection.
Getting the software
Go to the download page and fetch the latest version for your os. It comes either as zip package or as pkg installer. If you have a zip package, unzip it and drag the application on your programs folder. If you got a pkg installer, run it.
Updating the software
The software comes with an automatic updater since version 0.32. If you are not questioned for an update directly, go to the menu and run “Help”->”Check for updates”.
Configuration
Configuring your printer
The next step should be, to configure your printer so you can connect your computer with the host. Make sure your printer is connected and enabled. Some printer need special driver to access the device, so make sure the drivers are also installed. If you have uploaded the firmware to your printer, the driver is already installed.
Click on the “Printer settings” button in the toolbar. You will see a window like this:
At the top you see a drop down box, with the currently selected printer. At the start you have only the default printer. To create a new printer press the “Add”-button and give it a new name. The new printer will start with the same settings as the last selected printer.
Below the drop down box you see four tabs with most off the data stored with the printer configuration. In addition to this, for each configuration a start/end/pause/kill and five user defines scripts are stored with configuration. These can be changed in the g-code editor, which is described in a different chapter.
In this first tab, you set how to connect with your printer. In “Port” you select the port, where your printer is connected. At the opening of the window, all available ports were scanned and added to the list. Select the right one. Then select the baud rate entered into the firmware. Stopbits and parity are correct for 99,9% of the printer, so leave them untouched.
The transfer protocol determines, how the host will communicate with the printer. All supported firmwares work in ASCII mode. The Repetier-Firmware also supports a binary format. The advantages of the binary format are:
- Reduced data size. Normal data is reduced to 50%.
- Better error correction.
- Less computation time needed for the firmware to parse the data.
You can leave this on “Autodetect”, which will automatically switch to binary format if Repetier-Firmware is detected. For all other firmwares, the ASCII communication is used.
The next decision is, how to send data to the firmware. The method that was planned with the first firmwares works like ping-pong. The host send a command and waits for the firmware to return an ok. This causes latencies, which can result in empty buffers if you have many small moves. To improve speed, you can allow the host to send more then one command at once. Your printer has a input buffer. As long as you are sending not more then the size of the buffer, you can send more then one command if they fit into the buffer. So if you disable the ping-pong mode, the host will send up to “Receive cache size” bytes, before it waits for the ok, telling him that the command is processed. If you are unsure on the printer buffer size select 63, which works on all printers. Firmware compiled with Ardunio versions before 1.0 even allow 127 bytes.
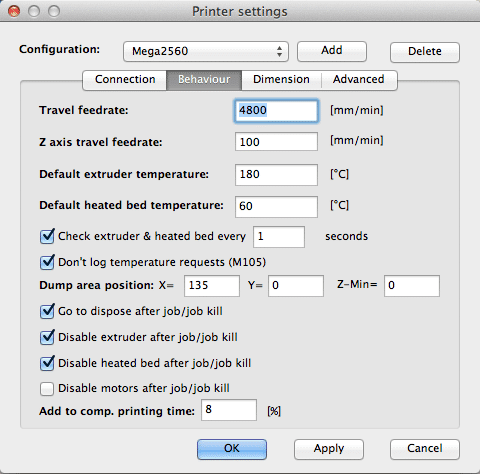
The second tab defines important behavior you want. The Travel feed rate and Z-axis feed rate are used, when you move the extruder with the manual controls. The temperatures are set in the manual controls als start values. You can change them there any time.
When you turn the extruder on, you surely want to know the temperature of it. This is done by sending the M105 command to the printer. If you don’t plan to do this yourself every x seconds leave the option checked. You can also select how often you want the host to check the temperature. The default 3 seconds are a good start. With every request you get 2 entries in your log. The host will show the read temperature at the bottom in the status bar, so removing these messages from the log makes it much more readable.
Park position is where you like your extruder head the most. In the manual control you have a button to move the head to the park position. You can also tell the host to go to this position, after a print is finished.
The next check boxes define, what the printer should do, when a print is finished.
With “Add to comp. printing time” you define, how the host should correct the computed printing time. When the host computes the time from g-code, it assumes all moves are executed at the feed rate requested. If you do a slow print, this will be quite correct, except that it doesn’t take the time to heat the extruder/bed into account. With fast prints, the firmware needs to accelerate/decelerate a log, which increases the print time. Ofter some prints, where you compared the computed and real printing time, you should be able to figure out how much percent you need to add to the computed time. Don’t expect to match every print. Depending on the geometry, the time will still differ a bit.
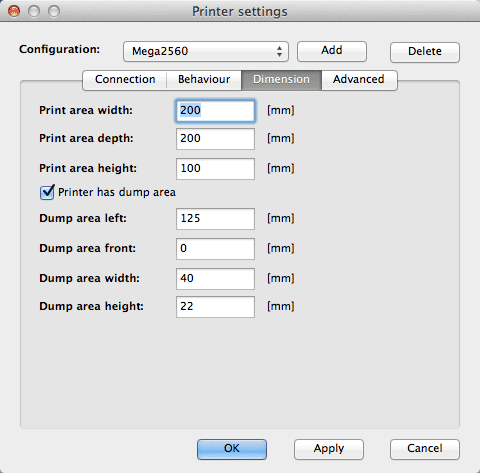
The third tab defines your printer shape, or to be more exact the shape of your build area. The host will use this to limit your moves and to check, if your models fit onto the print bed. You can also define the position of the x and y end stop.
The dump area is a rectangular hole in your print bed, where you can drop filament. Mostly the original Mendel had this. If you don’t have a dump area, leave the option unchecked.
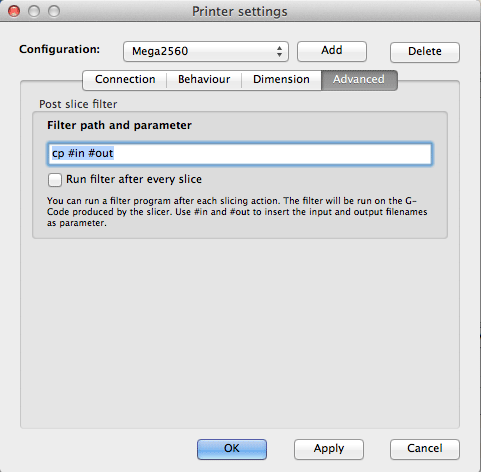
The last tab is for advanced configurations, you most probably will never need. Currently it only contains a postprocess filter. After the slicer is done with slicing, you can start an external program with the g-code. This program must save the resulting g-code in the file named by the #out parameter.


