Manual Control
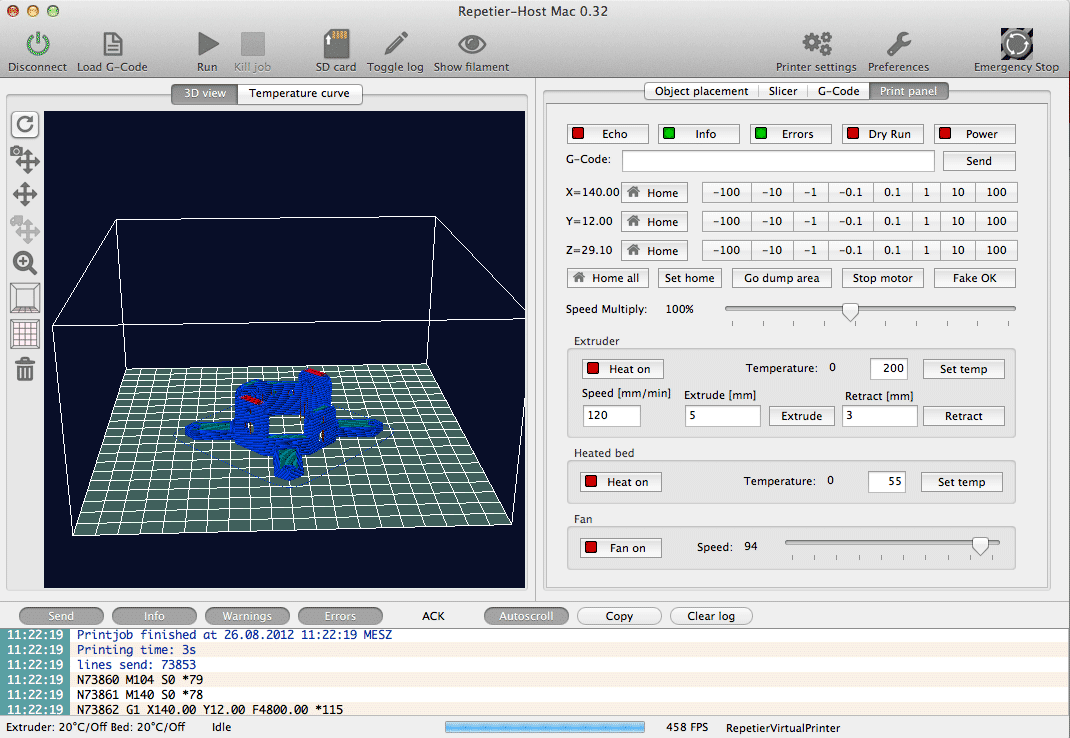
When you turn your printer on, you will often come to this tab. The above picture shows the tab after connecting with the printer. In the first row you can set debug options for the printer. Echo repeats the received lines, so you normally want it turned off. Info and error show messages at that debug level. These are interesting, so leave them on. The last one is something special, which works up to now only with Repetier-Firmware. In dry run mode, the firmware will ignore all commands to set temperature or extrude. That way you can send a file without using any filament. This is handy if your printer loses steps during print and you are doing some research on when and why. If you seem to have troubles with your extruder, check if you have that option enabled!
The next row allows it to send any g-code command you like. Enter it and press return or hit the send button. With the cursor up/down keys you can move through the history of manually send commands.
The next block controls the positioning of the extruder. Click the botton and the extruder moves the stated distance in that direction. On the left you see the current extruder position. After the connection, they are red. Red means the host has no idea where the extruder really is. Press the home button to move the extruder to its defined position. After that the color turns black, telling you the position is known.
Below the arrows you have the following buttons:
Home all: Homes all axis at once.
Set home: Marks current position as home.
Stop motor: Will disable the stepper motors.
Go dump area: Moves the extruder head into parking position defined in printer settings.
The last button “Fake ok” fakes a receiving ok from the printer. If your printer stalls, it may be simply because the firmware send an ok and only the o or k was received. In that case, hitting ok can restart the printing process.
The “Speed multiply” slider allows it to change the printing/move speed in relation to the send feed rate. This function is tested with Repetier-Firmware and Marlin. Be careful if you increase the speed. If you haven’t defined the real limits in your firmware this can cause lost steps during print!
The extruder and print bed blocks allow it to change the temperature. The button indicates, if the heating is turned on (green). If it is, the value entered as temperature is set. To the left you see the last read temperature (you have enabled automatic temperature reading in printer settings?). With the arrows you can change the temperature. If you change it in the text field, you need to press return or leave the field to set the value. In the extruder box, you can also extrude and retract filament, which is handy if you switch filament or to refill the nozzle with fresh filament.
If you have a fan attached, you can change the fan speed with the slider in the fan box.

