

Slicing
Setup your slicer
Before you can use any slicer, you need to tell the host, where to find the needed executables and profiles. If you have used a recent windows installer, these values are already set. In addition to this, you can also add as many references to other slicer instances as you like. To do this, open the slicer manager and the following window will appear:
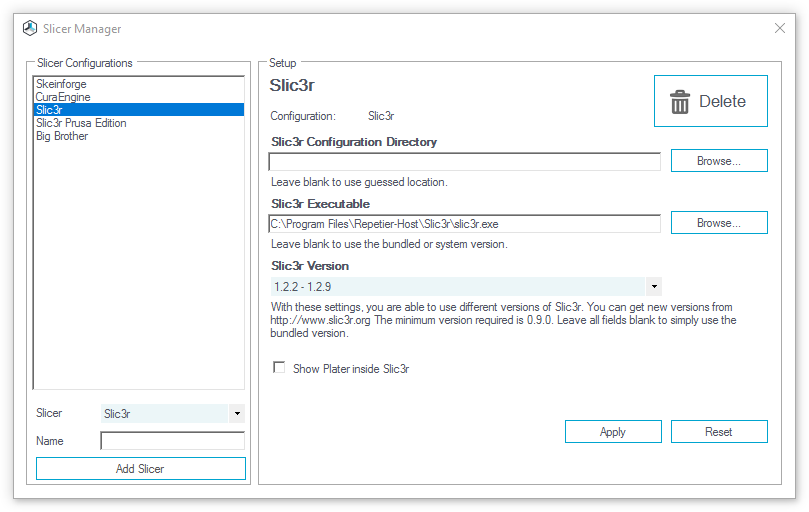
On the left side you see a list of configured slicer instances. At the bottom you can add new instances. Select the slicer type and give it a unique name under whitch it will appear in the host and click  . Then you see at the right side the setup for the selected slicer.
SLIC3R
Skeinforge

For Skeinforge two programs are needed. The first is the application itself. It will show all profiles and also allows to slice objects. You will only use it to define your slicing profiles. The second one is the workhorse called skeinforge_craft.py. This is the program that does the slicing. If you use SFACT instead of Skeinforge, you need to define a working directory. This directory defines where the profiles are stored. The profiles directory is, where Skeinforge stores the defined slicing profiles. If you haven’t started Skeinforge before, this directory will not exist. Skeinforge creates this directory in your home directory with the name .skeinforge. You need to select the profiles subdirectory in it.
Skeinforge is written in python and requires python 2.7 to run. Select the python interpreter to use. For 3 to 4 times faster slicing times you should also install pypy and select the executable. If you leave it empty, the python interpreter is used instead.
The windows installer already installs and sets python and pypy. If you leave the fields empty, the host uses the bundled versions. For Linux it will also look into the default paths, if the package is installed. In this case you can leave the fields empty.
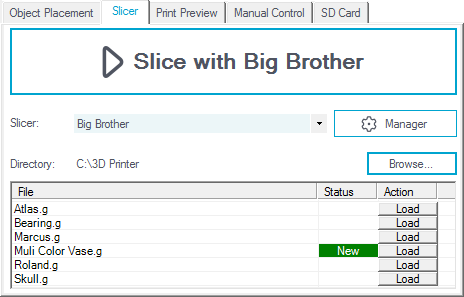
Watch Directory

If you use an external slicer, it normally requires quite some clicks to import the generated g-code into the host. The watch directory will help you to import new files faster. In the setup you select the file types to watch for, e.g. gcode;g will show all .gcode and .g files in the watch directory. Please remember to separate different file types with semicolon. The directory itself can be selected in the slicer tab. Every time the host window gets the focus, the content of the directory is checked. If a new file appears or is newer, it will be shown in the status column. There you only have to push the “Load” button on the right side to load the g-code.
Slice with CuraEngine

CuraEngine is an external slicer software which is bundled with the host. To use it, you normally only need the right tab with the quick settings. Here you select your predefined configurations to use plus some important settings. To define the parameters behind your configuration, click the “Configuration” button  to enter the setup.
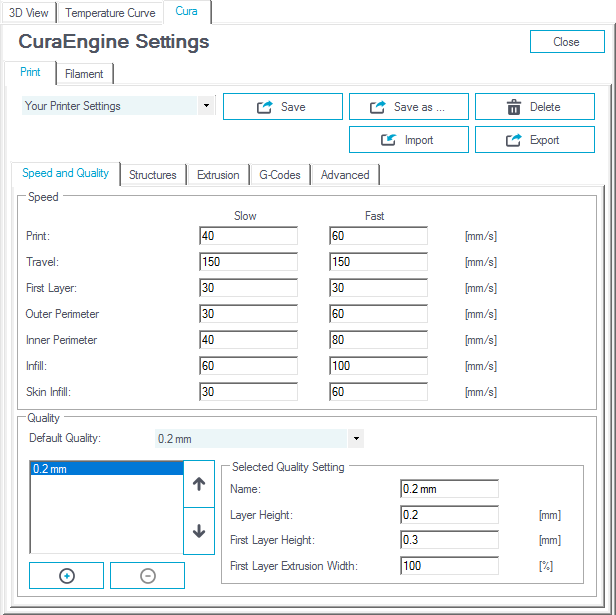
The configuration is split into two main parts. The biggest part are the print settings, these are subdivided into five tabs. The second part are filament settings, which contain parameters influenced by the filament selection.
To add a new configuration, simply save the current settings with the “Save as …” button. By clicking into a parameter field or by hovering a field, a helb bubble will show up with detailed informations about this parameter. You can deactivate this function at Config -> Preferences -> Basic Settings -> Show Help Bubbles.
You can enter two speed values per parameter. With the speed slider in the CuraEncgine slicer tab you interpolate between these values. This allows you a fast change between quality and speed.
In the quality group, you can define several passible layer heights, that work with this print configuration. For sliching you select the quality you want. This greatly reduces the number of configurations you need.
Some settings are always taken from the Printer Settings -> Extruder.

CuraEngine does not handle temperatures. You need to set them in the “G-Codes” tab. In this tab you can define the code segments that get inserted at the start, the end and before and after an extruder switch. Hitting the “Create Default” button creates a good starting script depending on your extruder numbers. You can insert some values from your configuration like temperature for extruder 1, which would look like this: {TEMP0}
You can also add or subtract a value: {TEMP0-20} {TEMP0+10}
For extruder switching you often want to reduce the temperture of the current extruder. That value can always be reached with {TEMP}. So in your “Before Extruder Switch” code you would use
M104 {TEMP-20}
and in the “After Extruder Switch”
M109 {TEMP}
Adding this requires a postprocessing step, so slicing will be a bit slower.

Slice with Slic3r

Slic3r is an external slicer software which is bundled with the host. You can start it directly from the host with the “Configuration” button . There you can create as many profiles as you like. Give them good names, so you know what they contain. When you switch back to the host, you will see these configuration in the combo boxes right to “Print Settings”, “Printer Settings” and “Extruder 1/2/3”. To slice objects loaded into the host, you select the profiles you want to use for your slice and hit “Slice with Slic3r”. A progress bar will appear and show you the current action of slic3r. If slic3r has any errors during slicing process, these will appear in th elog window, so always make sure the log is visible. When the host claims, it could not find the sliced g-code it is normally an error that caused Slic3r not to export the file. See report for more informations about this.
One cool feature is the “Override Slic3r Settings”. If you enable it, the values in the selected profiles get overwritten with values set below. As a first action you will probably click “Copy Print Settings to Override”. This will copy the values from the selected profiles to the controls below. Now you can change the most often changed values directly without the need to create/modify the profile in Slic3r.
Slice with Skeinforge

Skeinforge is an external slicer software which is bundled with the host and works nearly the same, the only difference is, that you have only one profile type to select from.
Common Errors
Slicers are complex tools that rely on correct data. If you insert unclear data, the slicer does not know what the result should look like and may produce unexpected results. The typical reason is a non-manifold mesh. To understand what a non-manifold mesh is, you should know what a manifold mesh should look like. A manifold mesh is watertight – no holes allowed. Every edge of the describing triangles must have exactly two connected triangles. So it is build from one or more non-intersecting shells.
It is also not allowed to stack obejcts on top. Often you see an object where some letters are written on top. If you do this, you need to merge the letters with the object beneath to build one shell. If you don’t, Slic3r e.g. will drop the letters to the bottom for exactly that reason.
An other typical error is using high layer heights. Layer height must be smaller then nozzle diameter.
Repairing Models
The best way is to use a software, that always exports correct STL files. Depending on source or software, this may not work. In that case, you should repair the exported STL/OBJ files with an appropiate software.
One easy way to correct these models is with netfabb cloud service.
An other program is the free Autodesk 3D Print Utility.