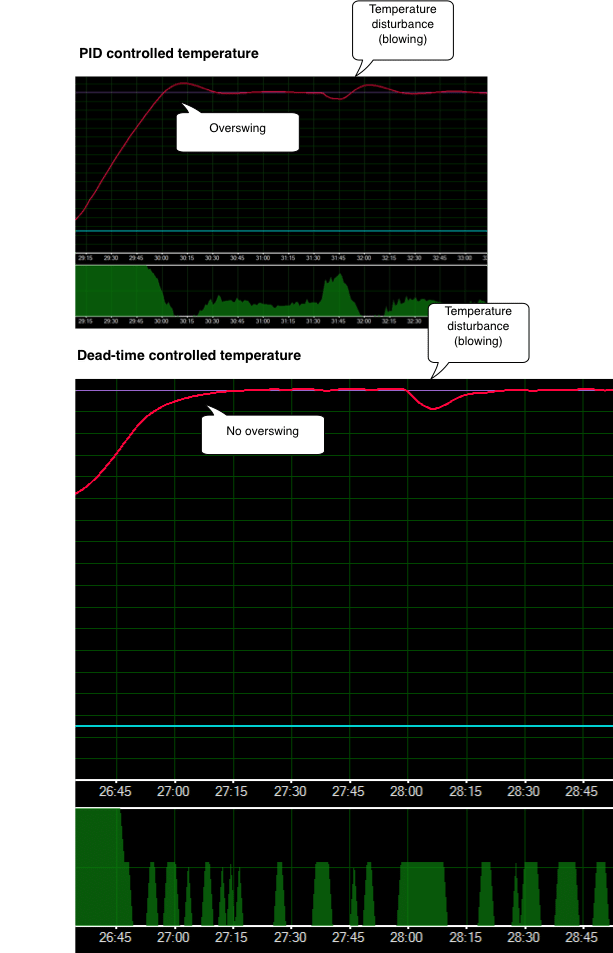
Everybody wants a ultra steady temperature and until now the way to go seemed to use a PID controller. As RepRap enthusiast Dr.-Ing. Martin Henschke pointed out on a german forum page, is the PID controller not the best idea. We all know we can get a steady line, so what is the problem? The problem is, the controller always lags behind. If we power on the heater we have a delay, until we see a change in temperature. That is why we see these overswings. We also get these overswings if something disturbs the temperature flow like enabled fans or wind. Then again PID starts it’s job to reduce the swings. So what could we do better?
We could take the time between power on and temperature change into account. This delay we call dead-time and is easy to measure. The printer where I tested it had a delay of 8 seconds. If we now take the current tendency of temperature change and interpolate it dead-time seconds into the future, we know when we have to enable the heater. So we enable/disable it always some seconds before the temperature reaches the target temperature. Because of the delay, this is exactly what we want. No big overshoot any more. And even external disturbances correct much faster.

Setup
There are only three parameter, you need to change. First set heat manager to 3. Second set pid drive max value to a value high enough to reach some more degrees then you need for your filament. In therory you can set it to 255, but if you have a good heater it will keep the temperatures a bit higher then you want. In the Configuration.h this is set with
#define EXT0_PID_INTEGRAL_DRIVE_MAX 140
If you have enabled EEPROM support, you need to make your changes there.
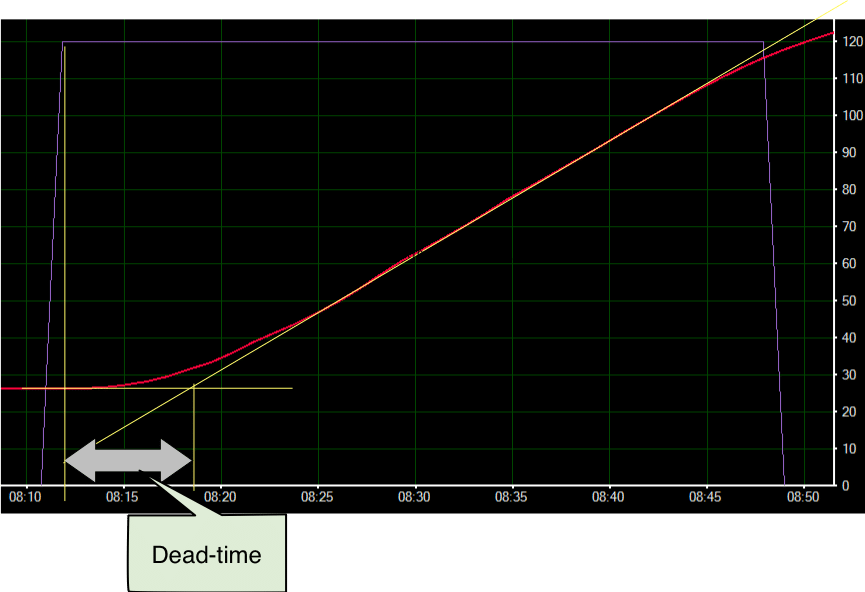
The last value is the dead-time. We can read that directly from a temperature graph. For this explanation, we will use Repetier-Host. First we set the temperature polling interval to one second and zoom the temperature graph to show only one minute. Also make sure to show the target temperature, we need it later. If the extruder is at room temperature we set the temperature to 120°C (any other higher temperature will also work). We will see the temperature raising after a few seconds. We wait until the graph is a clear ascending line and then disable extruder and make a screenshot. The following image shows how to extract the dead-time from this graph.
The procedure is quite simple with a graphic program. Draw a continued line with the original temperature and a line which is a good regression through the ascending temperature. Then draw two vertical lines from where the set temperature was set and where the first two lines cross. The difference between these two lines on the time scale is the dead-time.

