Repetier-Firmware configuration tool for version 0.92.9 version

Introduction

The configurator is the solution to the typical configuration hell when it comes to creating or updating a new firmware for your 3d printer. While the wanted values are quite simple, many users get lost in the different options and when they need to be set. In this configurator we try to hide all information and settings that are not relevant for your printer, based on previous answers. For that reason work yourself through the top menus from left to right and answer the questions from top to bottom.

This is the latest stable version. You can also use the older version 0.91 or the development version with all fixes and improvements for the next major release.
Switch to 0.91

Switch to 1.0.x

Upload old configuration

If you have already made a configuration - including older versions - you can upload the Configuration.h or config.json file to set all options to that settings. If you choose the Configuration.h, the settings are taken from the embedded json string. All changes in the normal part are lost. New parameter are highlighted like this:

I'm a new option!

Attention! Only config files generated by this configuration tool can be uploaded!

If you enable eeprom, you can change the most important parameter after installation over the host. Please be aware that the eeprom values overwrite settings in Configuration.h! To overwrite exiting settings select a different eeprom set.

If you intend to use the printer from a linux pc, select a ansi baud rate.

If you intend to use the printer from a linux pc, select a ansi baud rate.

Dimensions

[mm]
[mm]
[mm]
[mm]
[mm]
[mm]
[mm]
[mm]

You need to enter the horizontal distance of the diagonal rod, when the carriage is at center position.
[mm]

Minimum distance of the slider to the floor.
[mm]

This value limits the movement radius to prevent illegal positions.
[°]
[mm]
[mm]

Z-correction (distortion correction)

Sometimes it is hard to calibrate your delta printer in such a way that the bed is even - even if it is even. The nonlinearities and build errors can make it a bump map when measured, making it hard to stick filament everywhere. In this case you can now use the the Z-correction. But be warned, to use it only after you have done your best to calibrate your printer! It will not remove these errors, it will only removed the effect on the first layers! You can set from where to where you want the correction. You should start after the heighest first layer you want to print and stop a few layers higher. These corrections need extra computation cost, so you should limit them to an area where necessary.

Storing correction data in eeprom reduces RAM usage and it also eliminate sthe need to recalibrate after each restart.
If you extrapolate outer corners, you can increase your correction radius a bit.
[mm]
[mm]
Creates Size x Size grid with maximum 22 points per row. Each point takes 4 byte RAM/EEPROM.

Minimum/maximum points for distortion measurement. Select largest possible area that can be reached with your z-probe.

[mm]
[mm]
[mm]
[mm]
[mm]
[-]
Select a value, that makes 1-2 updates at maximum speed. This way you prevent to much computational slowdown while in correction range. So if points are 30mm apart and max. speed is 150mm/s with 200 updates per second, one update is 150/200 = 0.75mm and you want 30/2/0.75 = 20.

Stepper

[s]
[s, 0 = disabled]
[-]
[-]
[10-xxx, higher values need more ram. If you use too much ram your firmware will crash!]
[microseconds] Needed for gantry systems and due boards.
[microseconds] Needed only for slow stepper drivers.
[Hz, Atmel AVR has a limit near 12000 Hz]
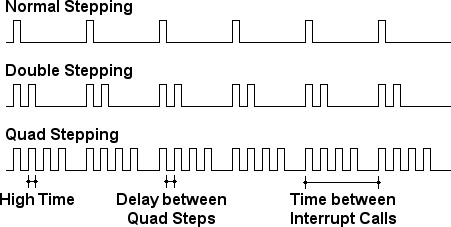
[microseconds, increase when you loose steps going > double step frequency]
[moves]
[entries, 0..Move Cache Size]
[processor steps]
[mm/s]
[mm/s]

X axis stepper motor

[steps per mm]
[mm/s]
[mm/s]
[mm/s2]
[mm/s2]
[mm]

Y axis stepper motor

[steps per mm]
[mm/s]
[mm/s]
[mm/s2]
[mm/s2]
[mm]

Z axis stepper motor

[steps per mm]
[mm/s]
[mm/s]
[mm/s2]
[mm/s2]
[mm/s]
[%] (100 = same as at bottom)

Endstops

[°C]
[mm]
[mm / 999999 = do not change]

You can test the endstops with the M119 command. As long as they are not triggered, the returned message should show "L" as signal state.
[mm for X,Y and Z]
[- for X,Y and Z]
[mm for X,Y and Z]
This is the distance, that the extruder will have to endstops after homing is finished. Use this if you want to prevent triggering when you are near endstops or for delta printers to go a bit lower, so you can select between extruders without hitting the endstop.

Pause handling

[mm]

Jam detection and out of filament detection

You can compare filament moves with extruder moves to detect if the extruder is jamming, the spool is knotted or if you are running out of filament. You need a movement tracker, that changes a digital signal every x extrusion steps. There are three steps defined for signaling. Regular steps is what number of steps a complete on/off cycle of the signal should take. While debugging this is the reference for the percent output. Next stage is slowdown steps. When we measure this step amount, we will reduce speed multiplier to a lower factor. Then, when we exceed the steps for jam detection we take a defined action - preferrably a pause giving the user a chance to fix the jam and continue printing. See documentation for more informations.

[steps]
[steps]
[%]
[steps]
[steps]

Available tools

Note: FFF printing gets included as soon as you define extruders!

Laser

If the firmware is in laser mode, it can control a laser output to cut or engrave materials. Please use this feature only if you know about safety and required protection. Lasers are dangerous and can hurt or make you blind!!!

The default laser driver only supports laser on and off. Here you control the eíntensity with your feedrate. For exchangeable diode lasers this is normally enough. If you need more control you can set the intensity in a range 0-255 with a custom extension to the driver. See driver.h and comments on how to extend the functions non invasive with our event system.

If you have a laser - powder system you will like your E override. If moves contain a increasing extruder position it will laser that move. With this trick you can use existing fdm slicers to laser the output. Laser width is extrusion width.

Other tools may use M3 and M5 to enable/disable laser. Here G1/G2/G3 moves have laser enabled and G0 moves have it disables.

In any case, laser only enables while moving. At the end of a move it gets automatically disabled.

CNC milling

If the firmware is in CNC mode, it can control a mill with M3/M4/M5. It works similar to laser mode, but mill keeps enabled during G0 moves and it allows setting rpm (only with event extension that supports this) and milling direction. It also can add a delay to wait for spindle to run on full speed.

Do not assign if you have direction control.
[milliseconds]
[milliseconds]

Fused Filament Fabrication

[°C, 0 = disabled]
If enabled, the temperature must be for watchperiod seconds inside a +/- corridor of the target range, before it is finished.
[°C]
Range where the selected heat manager controls output. Ouside this range extruder/bed are heated with full power.
[°C]
Calling M109 (set bed temp and wait) will finish immediately, if the bed has already a temperature that close to target temperature.
[°C]
Enables the extruder cooler if extruder temp is warmer or value is higher then this value.
[°C]
Ignores extruder moves, if extruder is cooler then this value.
[°C]
Maximum temperature you can define. Larger values get reduced to this value.
[°C]
Temperatures below this lets the firmware assume, that the thermistor is defect.
[°C]
Temperatures higher this lets the firmware assume, that the thermistor is defect.
[mm filament going in]
When you try to extruder more then this in one move, the extrusion gets ignored. Protects for wrong defined extrusion commands, e.g. if you stopped printing and did not reset extrusion position to 0.
[°C]
Firmware tests for decoupled sensor - heater. When target temperature is reached, the temperature may only swing this amount or it will mark your combination as decoupled. If you get false alarams after reaching target temperature, increase this value.
[°C]
On heatup, we expect at least this temperature rise after the time period set in the extruder. If your measurement is stable, 1 is the value you want.
[°C]
This speed is used when you switch between extruders to set new position.

Heated bed

[°C]
[°C]
[0-255] Determines maximum power for heater.
[s] > Maximum time required to rise temperature by DECOUPLING_TEST_MIN_TEMP_RISE = 1. If rising is slower, heaters will be disabled for safety.
[milliseconds]
[0-255] Minimum power when heating.
[0-255] Maximum power during pid control. Increase when target temperature can not be reached.
Increases power proportionally to temperature difference.
Integral factor
Damping factor
[0-255] Increase when target temperature can not be reached.
[seconds] Time between heater on and temperature rise.

Extruder

Extruder {{$index}}

[mm]
[mm]
[mm]
[mm/s]
[mm]
[steps per mm]
[mm/s2]
[0-255] Determines maximum power for heater.
[s] > Maximum time required to rise temperature by DECOUPLING_TEST_MIN_TEMP_RISE = 1. If rising is slower, heaters will be disabled for safety.
[0-255] Minimum power when heating.
[0-255] Maximum power during pid control. Increase when target temperature can not be reached.
Increases power proportionally to temperature difference.
Integral factor
Damping factor
[0-255] Increase when target temperature can not be reached.
[seconds] Time between heater on and temperature rise.
The extruder cooler is not the fan cooling your print! It cools only the extruder for a smaller transition zone.
[0-255]
[-]
[-]
[mm] Distance to retract during heat up.
[°C] Temperature, where the retract will take place
These commands get executed, when an extruder switch is commanded. First the deselect commands from the active extruder get executed, then the new extruder is selected and the select commands get executed. Separate multiple commands by "\n".

Temperature Tables

If you have a datasheet for your thermistor, you will find the values for T0/R0 (typical 25°C and 100000 Ohm) as well as the beta there. Min and max temperature defaults should work for all thermistors. The resistors R1 and R2 depend on your printer controller board. All known boards use R1=0 and R2=4700 ohm, which is also what the precomputed tables assume. Be aware that the computation from these values is not as exact as tables derived from the datasheet resistances at various temperatures. Especially for higher temperatures the drift gets stronger. You can get more exact values in your operating range, when you have T0/R0 in that range and not at 25°C.

Generic Table 1

[°C]
[Ohm]
[Kelvin]
[°C]
[°C]
[Ohm]
[Ohm]

Generic Table 2

[°C]
[Ohm]
[Kelvin]
[°C]
[°C]
[Ohm]
[Ohm]

Generic Table 3

[°C]
[Ohm]
[Kelvin]
[°C]
[°C]
[Ohm]
[Ohm]
If you have a datasheet for your thermistor, you can build your own thermistor table. To make it easy you can enter directly the temperatures and resistances from your datasheet. The adc values and modified temperature values are computed for you. All known boards use R1=0 and R2=4700 ohm, which is also what the precomputed tables assume. Do not use too much values. 20 degree steps for unused temperatures and 10° steps in important ranges are enough. More values only cost more computation time.

User defined Thermistor table 0

[Ohm]
[Ohm]
Temperature [°C] Resistance [Ohm] ADC
{{t.t}} {{t.r}} {{t.adc}}

User defined Thermistor table 1

[Ohm]
[Ohm]
Temperature [°C] Resistance [Ohm] ADC
{{t.t}} {{t.r}} {{t.adc}}

User defined Thermistor table 2

[Ohm]
[Ohm]
Temperature [°C] Resistance [Ohm] ADC
{{t.t}} {{t.r}} {{t.adc}}
[ms]
[0-255]

You can define one thermistor controlled fan. It will change fan pwm according to the set temperature range. Below min temperature it will disable the fan.

[ms]
[ms]
[ms]
[ms]
[-]
Separate commands by \n.

Axis compensation

If your printer is not exactly square but is more like a parallelogramm, you can use this to compensate the effect of printing squares like parallelogramms. Set the parameter to then tangens of the deviation from 90°„ when you print a square object. E.g. if you angle is 91° enter tan(1) = 0.017. If error doubles you have the wrong sign. Always hard to say since the other angle is 89° in this case!

[-] = Tan of angle error
[-] = Tan of angle error
[-] = Tan of angle error

Bed Coating

If you switch between different bed coatings it can be handy to change the required start position with a simple variable. This is what bed coating does. It makes sure that a move to z=0 does include the bed coating thickness. The coating mode takes into account what a z-probe will measure so current coating setting is taken into account.

[mm]

Z-Probing

[°C] = Min. temperature to enforce
[mm] = Max. distance to go back for next test
[mm] = distance between nozzle and bed when probe triggers
[mm/s]
[mm/s]
[mm] = how much is needed to go up to untrigger probe
[-]
[mm]
[mm]

Probe positions 1-3 are the points where the bed will be tested. Make sure they have a good distance and do not lye on a line.

This is for cantilevered beds with a rotation axis near center. It removes bending to both sides of the rotation axis by assuming symmetric bending to both sides. Points 2 and 3 define the rotation axis and measuring points for this axis. Point 1 gets mirrored on that axis.

Probe positions 1-3 define a rectangluar area where we measure a n x n matrix of heights. From these heights we compute a regression plane that fits best through all points. The rectangle is computed as follows: Point 1 = rectangle origin, Side 1: Point 1 <-> Point 2, Side 2: Point 1 <-> Point 3

[-]
X/Y in [mm] from origin

We use the computed rotation to compute a rotation matrix and solve the rotation on the software side. Moves in x and y direction will then also move z motors to compensate for rotation.

If you have a bed with 3 point fixture where you can move 2 points with a stepper motor, you can correct the tilt physically. For this to work you must define below the coordinates where the bed is fixed. Points 2 and 3 get controlled by the motor driver 1 and 2 defined below. These can be the same pins as used to drive the z axis in case you have 3 z motors using z mirroring. Just enter the enable/direction/step pins from these drivers. This correction is often not 100% correct, so you can also define how often to correct it. Correction will stop if slope is less then 0.025 mm in x and y direction.

[-]
X/Y in [mm] from origin

Bending correction adds a value to a measured z-probe value. This may be required when the z probe needs some force to trigger and this bends the bed down. Currently the correction values A/B/C correspond to z probe positions 1/2/3. In later versions a bending correction algorithm might be introduced to give it other meanings.

[mm]
[mm]
[mm]

G10/G11 Retraction and Filament Change

This feature allows slicers to use the commands G10 and G11 for retracting and undo retracts instead of adding the moves on their own. These parameters can be changed in EEPROM later. Autoretraction converts pure E moves into G10/G11. For that reason it is when enabled not possible to extrude with only E axis. So if you want to use it, I would suggest to enable/disable it with M209 S1 and M209 S0 in the slicers start and end g-code so it is normally disabled.

[mm]
[mm]
[mm/s]
[mm]
[mm]
[mm]
[mm/s]

Filament change allows to initaite a filament change procedure with M600 or the filament change command in the LCD interface. A LCD interface is required for this to work. Once initiated, the extruder will retract the short distance, move up, move to target x,y position and then do the long retract. Then you must replace the filament and insert new one until plastic comes out of the nozzle. Then click the ok button of the printer. While changing, the rotary encoder will move the extruder. If not moving, motor gets disabled to make insertion/removal easier. Then it goes back to starting position and continues printing. You can add a homing before going to target position. This may help if you moved the extruder by accident.

[mm]
[mm]
[mm]
[mm]
[mm]

Servo configuration

Pin
Start Position
Servos can use any digital pin. PWM is not necessary! Please note that servos should have their own 5V source, not the one used to power the board. Usage:
M340 P<servoId> S<pulseInUS> : servoID = 0..3, Servos are controlled by a pulse with normally between 500 and 2500 with 1500ms in center position. 0 turns servo off. Start position is set on power up. Values < 500 disable start position definition. Servos only go to start position if it has power for servos during startup!

Extra Motor Driver

For some special functions you may need to drive extra motors. Here you can define how to drive the motors. You can control them with G201 - G204, see Repetier.ino for more infos.

Motor Driver {{$index+1}}

[steps/mm]
[mm/s]

You selected custom configuration of your user interface. This is the most flexible option and requires you to modify uiconfig.h to your needs. Please read the configuration manual and the comments in uiconfig.h on how to do the setup correctly.

Some controller like Zonestar 802M need to set a analog pin for key assignment as they use a resistor based key detection. In that case you have to set here on which analog channel the pin is connected. For most controllers you let the value disabled.

[milliseconds]
[milliseconds]
[milliseconds]
[milliseconds]
[milliseconds]
[milliseconds]
[milliseconds]
[°C]
[°C]
[°C]
[°C]
[°C]
[°C]
[°C]
[°C]
[mm/s]
[mm]
Adds a menu entry in the LCD menu to toggle light on/off

Manual Additions

The content of this block gets added to the end of your config file.

Please notice the warnings below, which normally indicate a wrong or bad choice of configuration combination.

  • {{w}}

There are three options to continue your work:

  1. Download complete firmware incl. these settings
    This returns a zip file with the complete firmware including your settings in Configuration.h. You can upload the contained Configuration.h later to continue configuration or use it for future versions. The README.txt contains all instuctions needed for compilation.
  2. Download Configuration.h
    This returns only the modified Configuration.h file. Use it to update an existing firmware.
  3. Download config.json
    This file only contains your configuration settings. It is not needed for compilation and contains only the settings part of the Configuration.h. Useful for printer vendors who want to offer a pre configured and tested configuration to allow future firmware updates.